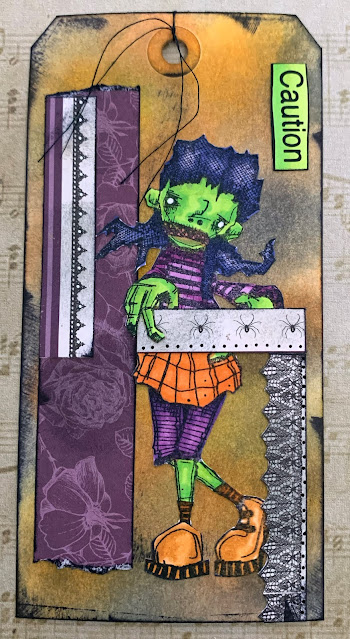
Let's make a simple zombie tag together. Simple? Yes. This took maybe ten minutes because I had all the materials located and together before I began. Whether you participate in Halloween activities or not - this simple tag can be made for any holiday or family celebration you wish to . . . uh, celebrate! Let me walk you through.
So, this is me pulling all my materials together. Actually, Sarah in
Creative Crafty Friends did much of the work by sending me one of the monthly project kits. She sent me the craft tag, the paper scraps you see and the stamped image of the zombie girl.
I began with some Dyestress ink pads - graphite, mustard seed and ripe persimmon. With the blending tool you see I scrubbed and scraped some of all three colors across the front of the tag. I also used my Copic markers to color my zombie person. I love her! So creepy! Hahaha!
This is my completed surface after using the three ink pads. Any ink pad you have will work just fine. Do I care that it is blotchy in areas? No. I do not care because I knew much of the space was going to be covered up with my elements.
If I was making a Christmas tag I could go with green, red, gold or silver and make the same kind of background.
I took those paper scraps and decided some strategic ways to use them. I already knew I wanted to make two of these tags - one to give away and one to keep - so I cut that purple scrap in half and hand tore the ends. In the other scrap I looked for elements that were interesting. The row of spiders, the row of lace and a row with black peaks. And I edged everything with black ink.
Placement was next. I wanted the row of spiders to be a cross bar for my zombie to stand behind. And to prop her hand on. To adhere the strips I used
sticky stuff from Joggles. Double sided tape and these pieces will never, ever pull up or fall off. Never, ever.
I ran my zombie girl through the
sticker machine, then fussy cut away all the white space. Leaving just her. This sticker machine is really cool. It turns any paper item into a legit sticker. I pulled the backing paper off and slid her right in - under the spider bar. Then stuck the bar into place with some more sticky stuff.
All that was left to do was add the remaining strips and come up with a sentiment. That did not come with my kit. I looked through my word box until I came up with the word
Caution from some Dyan Reaveley pieces I have. I colored it with the Copics to match the zombie skin. This piece of black string was included in my kit so I tied it on like a spider. A four-legged spider, hahaha! I love how this turned out! And yes, I did make a second one for myself! One is in a traveling journal I'm doing with Karen and the other is in a journal of my own. Yay!!!
Come Christmas I will totally be making another tag. Sometimes Joggles runs tags for a crazy cheap price. A couple years ago you could buy in bulk and they came out to about ten cents a piece. I bought 100 tags and I am still using them. When I make a Christmas tag I'll let you see. And I would love to see what you do with this idea! Don't have tags in your stash? Just cut one out of card stock. Easy peasy!


wow, very nice, creepy, dear Alice 👍😍❤️
ReplyDeleteHaha! Thanks!
DeleteWhat a cool tag! You should make these to give out at the door, lol! No cavities and the kids would love them!
ReplyDeleteHahaha!
Delete