Posts

Showing posts from January, 2021

Art Journaling on a Gelli Print

Image
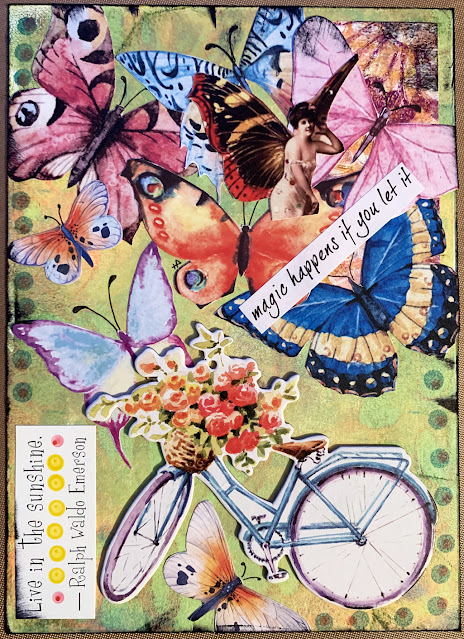
Gelli prints. Over the last month or so I have shown you a lot of different techniques making monoprints. All my gel printing plates are from Gelli Arts and typically I work on various papers from Hahnemühle . Today I want to walk you through this art journal page I made for a swap using those products. And a few more.  I began with this print made on Bristol Illustration paper from Hahnemühle. I can see remnants of a couple different pulls and stencils and colors. This is the kind of page I love! Versatile and useful with practically any color scheme. Or just to keep and look at and make me smile on occasion.  It did remind me of a beautiful garden kind of atmosphere, so I pulled out a bunch of butterfly collage pieces from Joggles. Barb has several butterfly sheets available. You can click here to see her collection.  I selected the butterflies I might want to use and put them through the sticker machine . I began by inking the outer edges of the print with black Archival ink . I

Loving This Daily Journal Thing!

Image
  This daily journaling was an idea put forward in Creative Crafty Friends on Facebook. It is difficult to find the time to do this every day but I am trying. Hahahaha! Just doing the days I can. This page was for the 24th of January. It was a freezing cold day and we stayed home. Those are gelli prints in the background. I made them using the gel printing plate from Gelli Arts . The steampunk cat is a digital image I downloaded and colored with Copics. Nothing fancy. The tile is Bristol Illustration paper from Hahnemühle . I colored it with Ecoline Brush Pens than tangled it using paradox . I don't use that pattern often because it confuses me.  This is how I set up my tile to tangle. Eight equal-ish sections and I tangled paradox in each section. I did one side going in one direction, then changed the direction for the other side. Thinking it would make the sides look different. It did not. At all. Hahahaha! I love how it turned out.  January 25th page. Gelli prints in the b

More Daily Journaling

Image
Not long ago I talked about daily journaling . Creative Crafty Friends gave the challenge to work in a journal each day, in whatever way you felt led. Some of the members are writing pages of their thoughts and activities. Mark and I are stay at home people with this Covid stuff going around and I mostly make art all day. Mark mostly plays with his dog, or works in the basement on 'guy' things, or watches sports. We don't go anywhere to 'do' anything. Except on Free Cake Day. Hahaha! So I am working with art and a few words. This was my page for January 23rd. I tangled the square tile after a Zoom class with Yvonne Westover. The tangle Avro was designed by Yvonne. It was fun and I actually think I could draw this again even though it looks complicated. Just one pattern did all that awesomeness. Those are gel prints in the background made with my gel printing plate from Gelli Arts . The little girl is a digital image I colored with Copics.  January 12th. All tiles

Goose, A Fun New Tangle

Image
  Today let's work with a tangle I have been drawing for awhile. It actually made its debut in Life in Tangles . Goose is a free-flowing, no mistakes kind of pattern that is easy and fun and doesn't take a lot of thought or effort. It begins with a spiral that you draw one direction, then spiral back on itself in the opposite direction. The petals are open and flowing. You can draw as many as you want to fit in your circle, then go back over them loosely making that second line. All loose - we aren't looking for perfection with goose.  If you have a copy of Life in Tangles,  you may recognize this piece of art. I filled those aura-ing lines of goose with pink on this page. It works great in gardens, as a stand alone, you can even make goose work undersea.  The background of this page appeared in Tangle Starts . The color was made using Dylusions Ink Sprays and the floral designs were made by spraying water through a stencil. I used a variation of goose in this piece.  A dig

Tangled Florals

Image
Florals. That is what I've been working on lately. Trying to learn and stretch myself. On this particular piece I wanted to add some of my own patterns to the mix.  The paper I chose to work on is from Hahnemühle . Of course :) this one is called The Collection . A watercolor paper that comes in a couple formats, the one I am using is cold pressed. You can see that just by looking at the photo. See the texture of the paper? Hot pressed is smooth. The sheets are large enough I can make two of these paintings on each page. I just used 1" painter's tape (because that is what I had) and taped off an area. Then tangled my flowers. Varying the heights of both the flowers and the leaves. Tangle patterns used: Lucy, goose, frond and weave. I drew with a Sharpie ultra fine . I knew I was going to use watercolor over it and that particular Sharpie does not smear with water.  I painted right inside that taped area. First - make sure the tape is securely down all around so the paint d

Working With Avro from Yvonne Westover

Image
Yesterday I had the opportunity to join a Zoom lesson taught by Canadian CZT Yvonne Westover. The subject of the session was Yvonne's fun and limitless tangle called Avro. Which also happens to be one of the 500+ tangles included in my latest book Life in Tangles .  Here is Avro as it shows in Life in Tangles, along with one of Yvonne's pieces of art showing Avro in the round. Based on the letter A, Avro offers many variations - or tangleations - and room for creativity. This was my first attempt at working the tangle. We took that basic A shape and added it in each quarter with the top of the letter pointing towards the center. Mine did not line up as well as Yvonne’s did but this was a good learning step for me.  Contrary to what some people think my tangling doesn’t always turn out the way I would like it to and here is the proof. Hahahaha! I like this one much better. We began with a double penciled circle and divided it all into eight sections. Each A segment points in tow

Watercoloring A Monoprint

Image
  Here is another postcard I made as part of Tracy Weinzapfel's 5-Day Postcard Challenge class. All my postcards were the Nostalgie ones from Hahnemühle that I had previously monoprinted. I used a gel printing plate from Gelli Arts and got some marvelous results.  This particular one was not my favorite. Actually it was probably my least favorite of all the prints I made that day. I thought using it for the class might turn it into something I liked. And it did exactly that. I was able to turn this card into my absolute favorite of all five we did in the challenge.  We worked with watercolors. Look at how well the watercolor covered up that awful yellow yet left the lines of the flowers underneath. Perfect!   And one step at a time we built our design. Tracy charges for this class , so I am leaving out much of the steps. I can't give that to you for free. You need to sign up for her postcard challenge and get in on the fun! We had a great time! These card projects are meant

Working With Red. Ugh!

Image
  How is that for a title? Hahahahaha! I do not like red. I grew a great distaste for red when I was in training to be a Copic Instructor. We had to color a Santa and those different shades of red and trying to blend just about did me in. So I was not all that hyped when Tracy told us we were working with red on day three.  Day three of what? That would be the 5-Day Postcard Challenge class taught by Tracy Weinzapfel. An artist I have followed for several years now. For the class I decided to work on the Nostalgie Postcards from Hahnemühle . A smooth 90 lb. card that can handle some wet and is easy to draw on. Prior to the class I had  a day of monoprinting and chose some of those prints for the postcard challenge. This particular print was made on a gel printing plate from Gelli Arts . I was hopeful that all the lines and squares would make some nice texture for all this red. Hahahaha! We began by taping down our postcards. Taping the edges to give us a nice crisp border for our pai