Alcohol Ink on a Gelli Plate

So I am trying something new. And though I did not get the results I expected, I really like the way these three backgrounds turned out. Birgit Koopsen with Gelli Arts recently had a post about using alcohol ink on a gel printing plate. I thought her idea was crazy but she got some absolutely beautiful results! Hahaha! Who knew! So I figured I would give it a go.

I watched her video several times and took loads of notes, then jumped right in. I decided to go with my Brea Reese Alcohol Inks. Just three colors. One for the base and two for the stencil. And my 5" x 7" gel printing plate from Gelli Arts.

I began with the cadmium yellow and squeezed out two drops of color. I actually tried one print before this one. It now resides in my trash can. But. What I learned from that experience is . . . less is enough. Just two drops of color.
Then I took my brayer and rolled the color out all over the printing plate. You can't see it well in this photo, but the entire plate is covered with yellow alcohol ink.

It is not necessary to let the ink dry for this particular technique. While the ink is still wet, I placed my stencil on top. Using a brayer, I rolled across the top of the stencil which basically adheres or 'clings' it to the plate so the next step works.

Using the medium magenta I began placing drops of color into the openings of the stencil.

And used the brayer to roll the color, the thought is to push the color down into the openings created by the stencil. Not necessarily so easy to do. But I do have a thought in mind for next time.

Next came a few drops of turquoise.

Which I also brayered through the stencil. Just those two colors with the yellow underneath. I was to leave the stencil in place until the alcohol ink was dry to the touch.

And then I removed the stencil and waited for this wonder to finish drying. Alcohol ink is not going to just lift off your plate in a print. There is one more step to make this work.

And that is to roll out a thin layer of acrylic paint over the entire plate. (I used white.) Then make your lift.

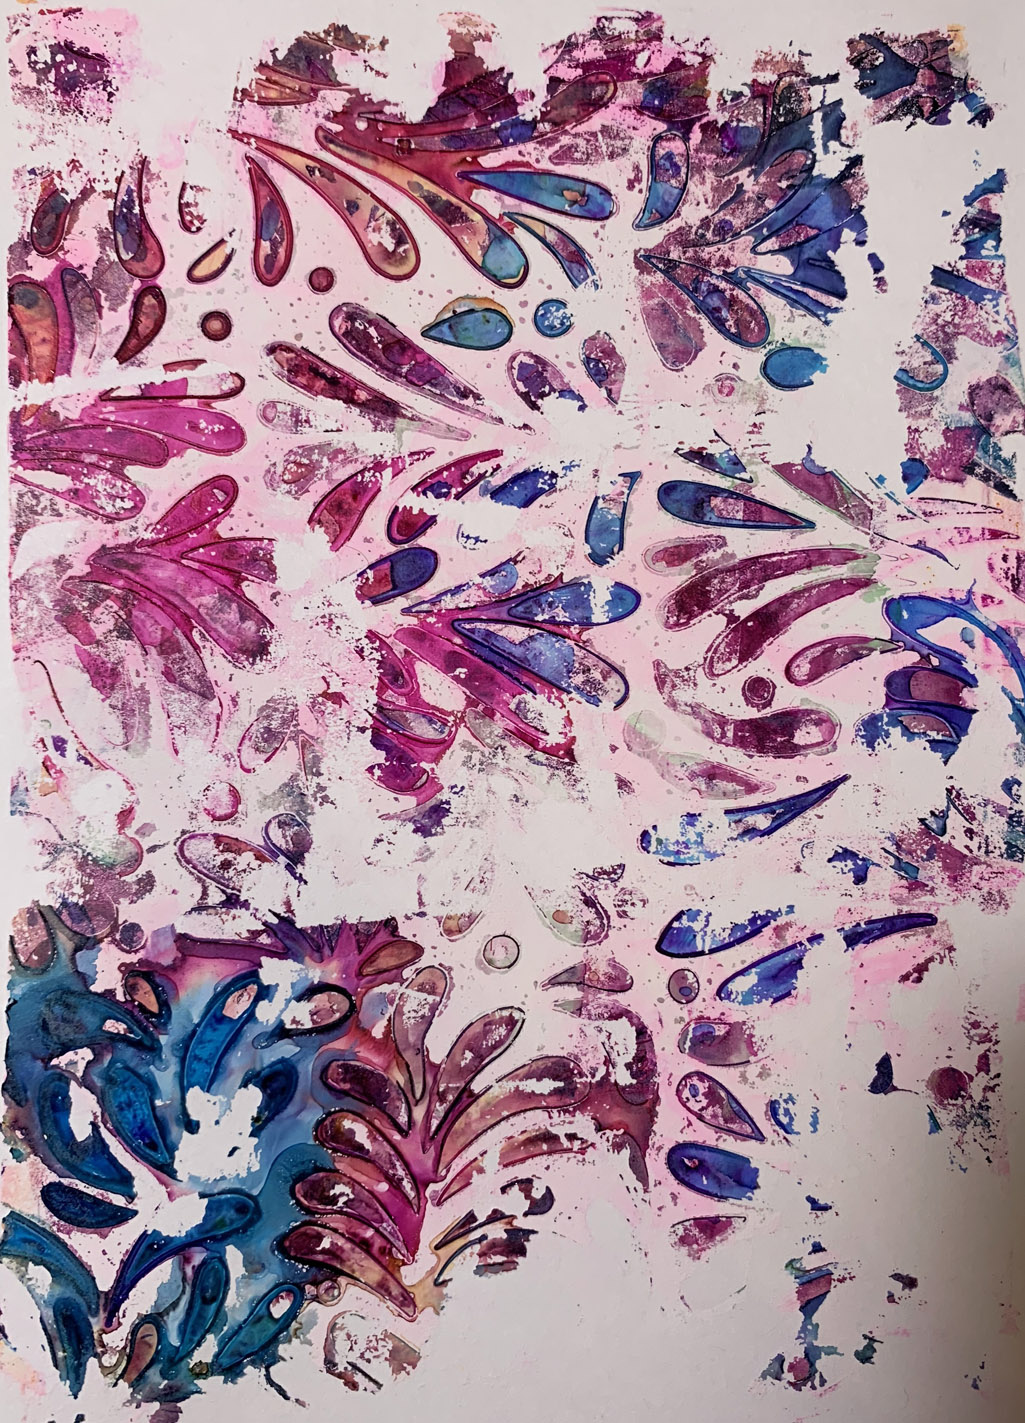
And here is my lift immediately after. I love it. Not what I expected but I love it. I believe all the pink in the background was caused by me not waiting long enough for the ink to dry before I added the white acrylic layer.

Here's a larger shot. I love how the brayer marks makes this look like a piece of fabric. The lines and texture created just adds to the piece as a whole. And I thought I understood better what changes to make for the next pull.

I began with some green drops of alcohol ink to brayer across my plate for this next one.

After placing my stencil, I ran the brayer over it to 'cling' it to the gel printing plate and started adding the same two colors as before. This time I tried to do a better job with getting the color into the spaces.

And it seemed to work better but I had a whole lot of blank space in the middle. Once this was totally dry - or at least more so than the first print I made - I rolled out my layer of acrylic.

So apparently not any drier than the first time. Sorry. It is a learning curve that I plan to master. Then I made my print.
Not as good as the first print but I still love it. I need to wait longer on the drying part and I need to figure out getting my color into the openings better. But don't you love this one anyway?

Last, I rolled out one more thin layer of white acrylic and made this last lift, essentially cleaning off the gelli plate. And I think this clean off piece is my favorite of the three. It reminds me of an old handkerchief my grandmother used to keep tucked up in the sleeve of her dress on the farm.
Observations: this was a fun technique to try and I will use it again. I was skeptical going in but am happy with my results. But I know I can do better. I have at least three more brands of alcohol inks I can play with. The first print was made on a 5" x 7" piece of Pen and Ink Paper from Hahnemühle. Gelli Arts and Hahnemühle gave me a load of product for a giveaway which is happening this week on Facebook in my group Tangle All Around. The Pen and Ink Pad is just one of the types of paper being given away. The last two prints I made on regular card stock. Mainly because I didn't think they were going to work. Hahahaha! Just goes to show you never know the outcome until you are done. Big thanks to both Gelli Arts and Hahnemühle for the fun time printing beautiful backgrounds.
Gelli Arts products can be found here.
Hahnemühle products can be found here.
Brea Reese alcohol inks can be found here.


Wow! This has such a delicate and elegant look. I got rid of all my alcohol inks a while back. This is the first time I regret it. I wonder how this would work with fountain pen inks.
ReplyDeleteI may have to try that and let you know. Haha! Great idea actually. Let me know if you try it.
DeleteTotally baffled by this - I'd have been very VERY sceptical too (US spelling is with a 'k' - I had to look it up!!! as I was trying to write it, forgetting completely how you'd spelt it). Glad you've got some time for yourself experimenting over the holidays.
ReplyDeleteI am still not sure why this worked but I like it and may try some more today :)
DeleteI love seeing your process! And I love that you just jump right in to see what happens!
ReplyDeleteHahaha! That’s what I do most of the time.
Delete