Puzzle Art With Gelli Arts and ZenART
What began as a blank, white jigsaw puzzle turned full circle with some help from Gelli Arts and ZenART! And so easy to do - I promise! Let me show you.
I started with a blank puzzle which I purchased online from Amazon. This particular one has 96 pieces and came four to the set. Put together the puzzle is about 10" x 16", larger than I expected when I ordered these. But a good workable size for adding art.
I did not do a thing to prep the surface, I just started working. Here I am using a well loved 5" x 7" gel printing plate from Gelli Arts which I had placed on an acrylic block. I added small bits of two different inexpensive Walmart craft paints.
After brayering out the color, I flipped my acrylic block and plate over and stamped the color straight onto the puzzle. I had no idea how the puzzle would react when I lifted the plate away. I was hoping for the best. And truthfully, saying a little prayer here and there.
And it all worked great. I had one place where the puzzle started to pull apart and I just stuck a finger right in there and held that sucker down tight. Hahahaha! I did use a stencil with some of these prints - you can see flowers. I love flower stencils. I just kept rolling out color and stamping my printing plate until the puzzle surface was mostly covered. I didn't get too excited about open areas because I was going to add more media.
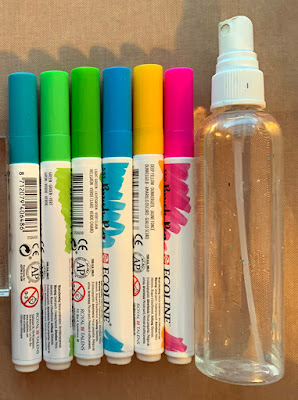
I thought some added texture would be a good place to start, so I brought out some Ecoline Brush Pens that I like and a spray bottle of water.
I scribbled color directly onto my craft mat and sprayed it with water. Then took a bit of bubble wrap I keep handy and placed it into the wet color.
And I just stamped the bubble wrap color onto my puzzle. Adding color and water and making more color until I had the whole puzzle covered with added texture. See how those open areas start to be less noticeable?
And you get some really lovely areas that look like this.
And right about here I accidentally deleted a photo. Oops! Under the template you can see swipes of purple and white that I swished on using a #8 flat Black Tulip brush from ZenART. Just something to add some movement. With my ultra fine Sharpie I began tracing circles. Each time I added a new product I hoped the puzzle would accept it. And the puzzle did. Every time. Yay!
My thought here was to add a bunch of flowers to the field. I heard you should work in odd numbers when adding things like this to your art. And I am just now counting and yes, I did add an odd number of circles. I got lucky!
I drew all my petals with double lines, with the ultra fine tip to start with. Then I went back over the lines with the fine tip to darken them up. A throw back to the postcard class I took from Tracy Weinzapfel. I love her work so much! I am adapting what she taught me to my own way of making art.
And kept going till the entire puzzle was covered in a field of flowers.
Next I used that same paintbrush from ZenART and added yellow and orange watercolor over the acrylic paint to the centers of the flowers, then painted pink all over the background. Because I used watercolor over the acrylic background - you can still see the texture bubble wrap I added, the purples streaks and the gelli printing showing through the layer of pink. The petals I left uncovered so you see straight gelli printing and texture marks on those places.
Detail work was added with a white Sharpie paint pen. Trying to get used to a larger size tip. Ugh.
And last was to add some sentiments - stamped in those centers. Something else I learned from Tracy. I was sorely lacking for sentiment stamps so I spent some money and bought a few. I love the way this puzzle turned out! You never know when you start a new project if it will work the way you envision it or not. And honestly when I started - I had no plan in mind other than get a lot of pretty color on the thing. Hahahahaha!
And now my puzzle looks like this. All taken apart and stored in a ziplock baggie. I believe I will take it out of the drawer in a few minutes and put it together while I eat some yogurt and berries for lunch. In all truthfulness I would rather be eating a handful of jelly bellies.
I am an Affiliate for ZenART. The brush I used can be found by clicking here.
Gel printing plates from Gelli Arts can be purchased by clicking here.


That's a beautiful puzzle! I love those flowers. I agree with you about the jelly bellies, but I usually have the yogurt, too.
ReplyDeletehahahaha! and sometimes I have both :)
DeleteThat looks like a VERY trickly puzzle to put together again. Well - I suppose it kept you occupied whilst getting the berries & yoghurt eaten!! It's fascinating seeing the way you're using the new techniques you learnt in Tracy's classes.
ReplyDeleteI really learned a lot from Tracy. I’m glad I can use that new knowledge and incorporate it into my art style.
DeleteI love this!! Wonderful use of your newly-acquired knowledge from Tracy. 👍 Had I discovered this about 6 years ago (when my granddaughter was about 5 years old) I would have made a puzzle for her! She’s graduated to 1,000 piece puzzles now ...
ReplyDeletehahaha! here you go: https://www.amazon.com/Jigsaw-Puzzles-Pieces-Adults-CHengQiSM/dp/B07TCD46PD/ref=sr_1_3?dchild=1&keywords=1000+piece+blank+jigsaw&qid=1614698901&sr=8-3
Delete