Yesterday's Stamped Tags

Here are the tags and journal page I made in yesterday's post, as well as the three stamps I made.


I squeezed out a drop of color straight onto each tag, then used a brayer to roll the color up and down. I could have just as easily brushed the color on with a brush, but rolling is so much fun!

Next I brought out a product I haven't used much before. Dylusions came out with a line of Shimmer Sprays that store laying on their sides. To keep all that fun shimmer from sticking to the bottom of the bottle. Fresh lime is one of my go-to's when I use Dylusions' other products so that is what I grabbed.

Shimmer is usually next to impossible to photograph and these Shimmer Sprays are no exceptions. All those areas where you see the green sprayed on - those are all shimmery when you turn the tags to admire from side to side.

I had some FINETEC Premium Pearlescent watercolors sitting on my desktop, so I painted on a few of their colors. Adding to the shimmer effect. You know . . . the one you can't see in these photos.

Book text. Book text makes a great layer. And you can leave it as is, or add product over it. Seal it with a layer of matte medium or clear gesso or something similar so the edges don't peel up. Dry these tags completely before moving on.


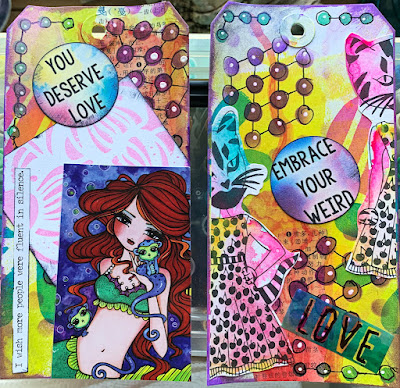
Those dots are from a new stencil I got recently - it is a Dylusions Stencil but any stencil with dots would work. I used a blending tool and a stamp pad to rub ink over the stencil in various places on my tags. The white is a Posca Paint Pen - it seems to work on everything.

Additions: some pen work, a Dylusions word block, a gelli print leftover scrap and that Hope circle was cut from a magazine. And my tag was complete. This is the one I sent for the swap. I love how that word block turned out. I painted the color onto the white background. I think I have one more of these in my little bag for another time.

You may remember I started with three tags. These are the two I kept for myself. They will end up in my daily journal at some point. Save your scraps and little bits of pretty paper. You can use them down the road. Words from magazines, pretty pictures you don't want to lose, we can always find a way to include them. Honest.
Yesterday I made two more stamps and I stamped four more tags and another journal page background. And I heard from a lot of you that were going to make some stamps of your own. I would love to see them. I am so happy I could inspire you to do something totally fun.
If you are not already subscribed to my blog, there is a subscribe block in the left sidebar. And it is easy to do.


These are bright, bold and beautiful!!! As always, Alice, thank you for sharing your process! You inspire me. :) :) :)
ReplyDeleteThank you! I hope you will make some tags, too
DeleteThose turned out so cool, and the sentiment is perfect. 😁
ReplyDeleteThank you, they are really fun and quick
DeleteI can hear you chuckling away - those word blocks are so apt for each individual design. I particularly like the way your tie-dyed sheep one has those bright colours on it reflecting the very nature of tie-dying..........
ReplyDeleteI will be sad when that word block is all gone - I think I have one more. I should use it in my daily journal, make a special page for it. hahahahaha!
Delete