Let's Draw Some Flowers


I started with a background. Here I am working in a watercolor 7" x 10" book from Grumbacher. I like this particular book because the pages pull out so you can work without the bulk of the book being in the way. Then when your page is finished - you can pop the page right back into the book for storage.
I began this page by laying down a one inch strip of blue painter's tape all the way around all four edges of the page. For color I used Schmincke watercolors - any brand will do - and started working in circles with two shades of blue. Not perfect circles, just circular in motion. I did not pre-wet the page first. And last I added some pretty purple to fill in the rest of the page. (Just leave that painter's tape on.)

Using a Sharpie ultra fine point marker I just followed the flow of the circles of blue. I had a plan in mind for making a blue sunflower and I had a plan for how I wanted to do the center. If you don't have a plan, just make the lines and a plan can come later. Don't overthink this. It is just a piece of paper. And pretty much any way you draw this will be right.

I wanted a sunflower. Yes, I know sunflowers are mostly yellow and I found out recently there are pink sunflowers. And according to Mr. Google there really are blue sunflowers as well. So I just started drawing petals. I use a Sharpie because it is permanent. It works well with wet media. And I was going to add more wet media so that is important.

I continued the petals all the way around, drawing right across the tape where I needed to. It is okay for your flower to totally fill up the space and look like it extends off your page.
In that purple section I added two flowers that are drawn similarly except with shorter round petals. And I wanted something to fill that band in between the two types of flowers. So I tangled some viola-type flowers in that area. You could leave it blank if you want. All my drawing was done before I started adding more color.
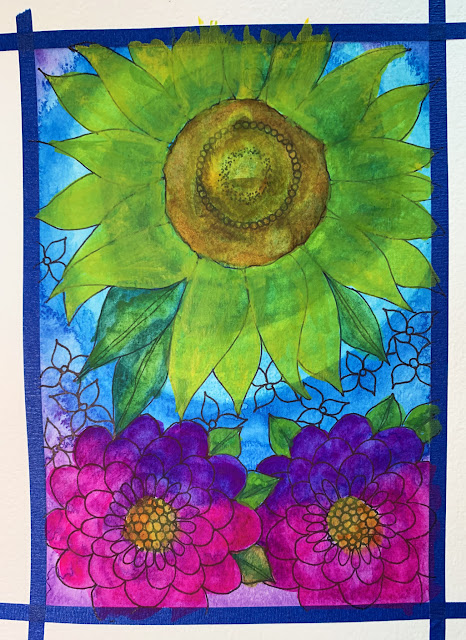
Don't be alarmed by how awful it looks at this point. Hahahaha! Gotta push past the uglies. I used my Schmincke watercolors again to paint the three larger flowers. I used a bright pretty yellow on those sunflower petals. The blue colors underneath make it look green but I am okay with that. Mainly because I know the next steps are going to make it look better.
The bright opera rose pink color I used on those lower flowers mixed with the blue and made purple. And I was okay with that as well.
I elected not to paint the little violas.
Notice the paint covers up a lot of my lines. This is why I don't detail the flowers until afterwards. Just basic lines before I paint.

Then comes the detail work. Just look at the sunflower for now. I used the ultra fine black Sharpie and a white Posca Paint Pen to add all the details. In the central part of the flower I added a lot of stippled black and white dots for the center, then a couple bands of the tangle weave for the textured part of the middle. I went back over the lines for the petals, then back traced them for a second layer of lines. Back traced? Do the same thing but in reverse. I did the black lines first and the white highlights last. Same for the leaves. And that is all there is to it.


I love your artwork! It's beautiful.
ReplyDeleteGorgeous paintings and fabulous tutorial, Alice!
ReplyDeleteThanks, Sandra, I never know how it’s going to turn out till I’m done.
DeleteThis is so effective - it looks like those big flower heads are floating on top of brilliant blue water in a lagoon somewhere, such depth created by your pen work. Your white highlights really catch the eye & I like how you've alternated gold & white on the little violas. A really eye-catching piece.
ReplyDeleteIt does look that way. I never know how these are going to turn out.
DeleteLove the pink and purple flowers!!!
ReplyDeleteoh yes, our colors <3
DeleteThis is beautiful Alice, wish they were in my garden!💜
ReplyDeleteOoh! Me, too!
DeleteGorgeous work Alice, thank you!
ReplyDeleteYes, you are welcome!
Delete